SQL Server Gold Image Creation
When you create a SQL Server deployment through ScaleGrid, new Windows VMs are deployed to host the database(s). We create these VMs by cloning a template you provide during the cloud profile creation. This document will guide you through the steps required to generate this image.
This document covers how to set up a SQL Server 2019 or SQL Server 2017 image, on a VM running Microsoft Windows 2019 or Microsoft Windows 2016 (with Desktop Experience). If you are using a different OS and/or SQL Server version, please reach out to our support team at [email protected]
Pre-requisites
You must have a clean virtual machine, with Microsoft Windows Server 2019 or 2016 installed, and at least 10GB free space on the C-Drive, before you proceed. You can clone your organization’s template to create a new virtual machine, or you can build your own. If you need help with installing Microsoft Windows Server, please refer to this guide.
- The template should have only one disk attached, which should have only the boot partition/C-drive on it
- We recommend using a 40GB thin-provisioned disk for this
- The template does not require a CD/DVD drive.
The rest of this document assumes you are using a virtual machine with Microsoft Windows 2016 or 2019 with Desktop Experience installed. If you must use the minimal server installation, please contact [email protected] for instructions.
The image you create will undergo sysprep. Any user-specific customization you make on this image will be lost.
Any custom software you install on this virtual machine should be pre-approved by ScaleGrid Support. You must also ensure the software is installed appropriately for syspreped templates - the software’s documentation should contain instructions on this.
Configuring the Windows Image
For smooth interoperation with ScaleGrid workflows, the Windows Image must have the following software(s) installed.
VMware Tools
ScaleGrid workflows depend on obtaining some metadata about newly created VMs through the vCenter - for example, their IP address and hostnames. For this to work, you must install the appropriate VMware Tools on the virtual machine.
You can do this by:
- Adding a CD-ROM drive to your virtual machine, if it does not already exist
- Right-click on the virtual machine → Guest OS → Install VMware Tools
- This will mount a CD in your CD-ROM drive. Log in to your VM and double-click on the drive to run the setup
- Follow the instructions on screen - we recommend accepting all defaults.
Please refer to the VMware help docs for detailed instructions.
[Optional] Allow Remote Desktop Access
If you wish to RDP into your database machines, you must enable RDP access. We recommend enabling this for the Administrator group only. If any non-admin users require RDP access to the machine, this can be configured from the ScaleGrid UI during database deployment.
You can do this by navigating to Server Manager → Local Server → Remote Desktop, and accepting all defaults. For detailed instructions, please refer to Microsoft’s help doc on the subject.
[Optional] Apply latest updates
If you created the virtual machine from an older template, we recommend applying the latest security updates. This will cut down the number of updates that need to be done during SQL Server deployment time.
You can do this by navigating to Server Manager → Local Server → Windows Update
Ensure network is configured for DHCP
ScaleGrid machines do not work with static addressing - the network must be configured to acquire an IP address over DHCP.
This is the default behaviour on Windows, but you can verify this by navigating to Server Manager → Local Server → Ethernet0. If it reads IPv4 address assigned by DHCP, it indicates the correct configuration. If you need help with changing the network configuration, please refer to Microsoft’s help doc on the subject.
Install Windows PowerShell modules
ScaleGrid requires two PowerShell modules for correct operation -
- PSWindowsUpdate - To initiate security patching from the command line (as part of the Patch-OS operation)
- SqlServer.XEvent - To perform performance analysis
If you have internet access on the virtual machine, please open a PowerShell window and type in the following commands:
Install-Module -Name PSWindowsUpdate
Install-Module -Name SqlServer.XEvent -RequiredVersion 1.5
If you encounter any errors, please contact [email protected].
If you are using Windows 2016, you might need to enable strong cryptography before you can install the module. You can use the following commands to verify, and enable strong cryptography, if required.
Note: You must restart PowerShell before proceeding with the install-module commands
#Check available security protocols
[Net.ServicePointManager]::SecurityProtocol

#If weak protocols are enabled, force .NET to use strong cryptography
Set-ItemProperty -Path 'HKLM:\SOFTWARE\Wow6432Node\Microsoft\.NetFramework\v4.0.30319' -Name 'SchUseStrongCrypto' -Value '1' -Type DWord
Set-ItemProperty -Path 'HKLM:\SOFTWARE\Microsoft\.NetFramework\v4.0.30319' -Name 'SchUseStrongCrypto' -Value '1' -Type DWord
If your vCenter does not have access to the public internet or does not permit downloads from PowerShell Gallery, you will need to install the modules offline. The simplest way to do this is to use a machine that does have internet access, and run the following commands:
Save-Module -Name PSWindowsUpdate -Path .\PSWindowsUpdate
Save-Module -Name SqlServer.XEvent - Path .\XEvent
Then copy the contents of PSWindowsUpdate and XEvent folders onto the virtual machine under "C:\Program Files\WindowsPowerShell\Modules"
Install .NET 4..8 Runtime
ScaleGrid requires templates to have the .NET 4..8 Runtime installed. You can find the online installer here (requires the machine to have internet access during installation), and the offline installer here.
Install PowerShell 7.2
ScaleGrid requires the latest version of PowerShell installed on the machine. You can find the installer for PowerShell 7.2 here. For other installation methods or more details, please refer to the Microsoft documentation.
And that’s it - now we can proceed to preparing the SQL Server image
Install SQL Server 2017 or 2019
Download the installer
If you already have the SQL Server ISO, you can skip this step.
Download the SQL Server 2019 installer bootstrapper or the SQL Server 2017 bootstrapper the public repository. Please note you must select ‘EXE’ under experience. We recommend downloading under the user directories, like Downloads - so sysprep can automatically clean the files up when creating new machines.
Once the download completes, double-click to execute → Download Media → Download as ISO. This will download the actual installation media.
If your virtual machine does not have internet access, you can do this step on a different machine and copy the ISO over to the actual machine. Or you attach the ISO through vCenter, using the CD-ROM drive.
Once you have your ISO ready, please mount it before proceeding to the next step. (If you downloaded the ISO onto the machine, double-clicking will mount it)
Prepare SQL Server for installation
Run setup.exe from the mounted ISO, to initiate the installation. From the UI,
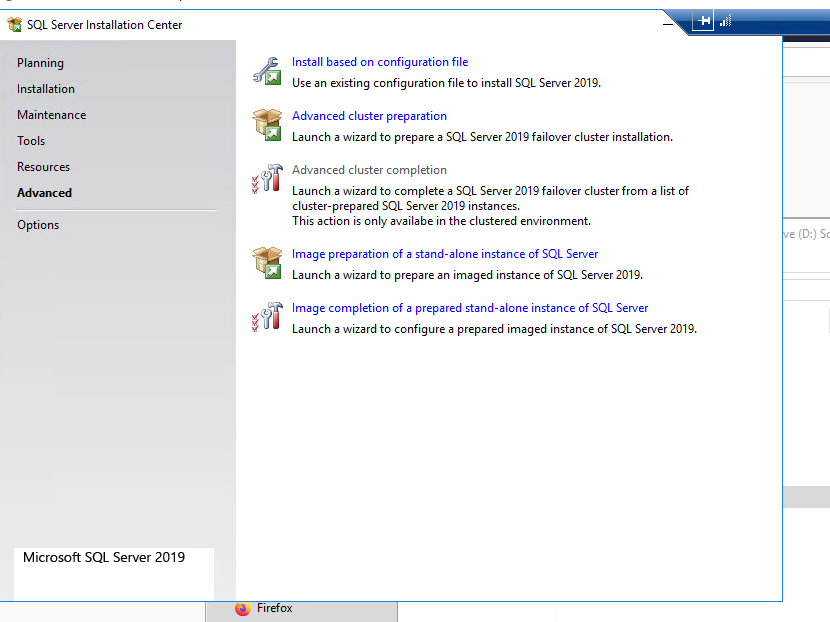
- Select Advanced → Image preparation for stand-alone

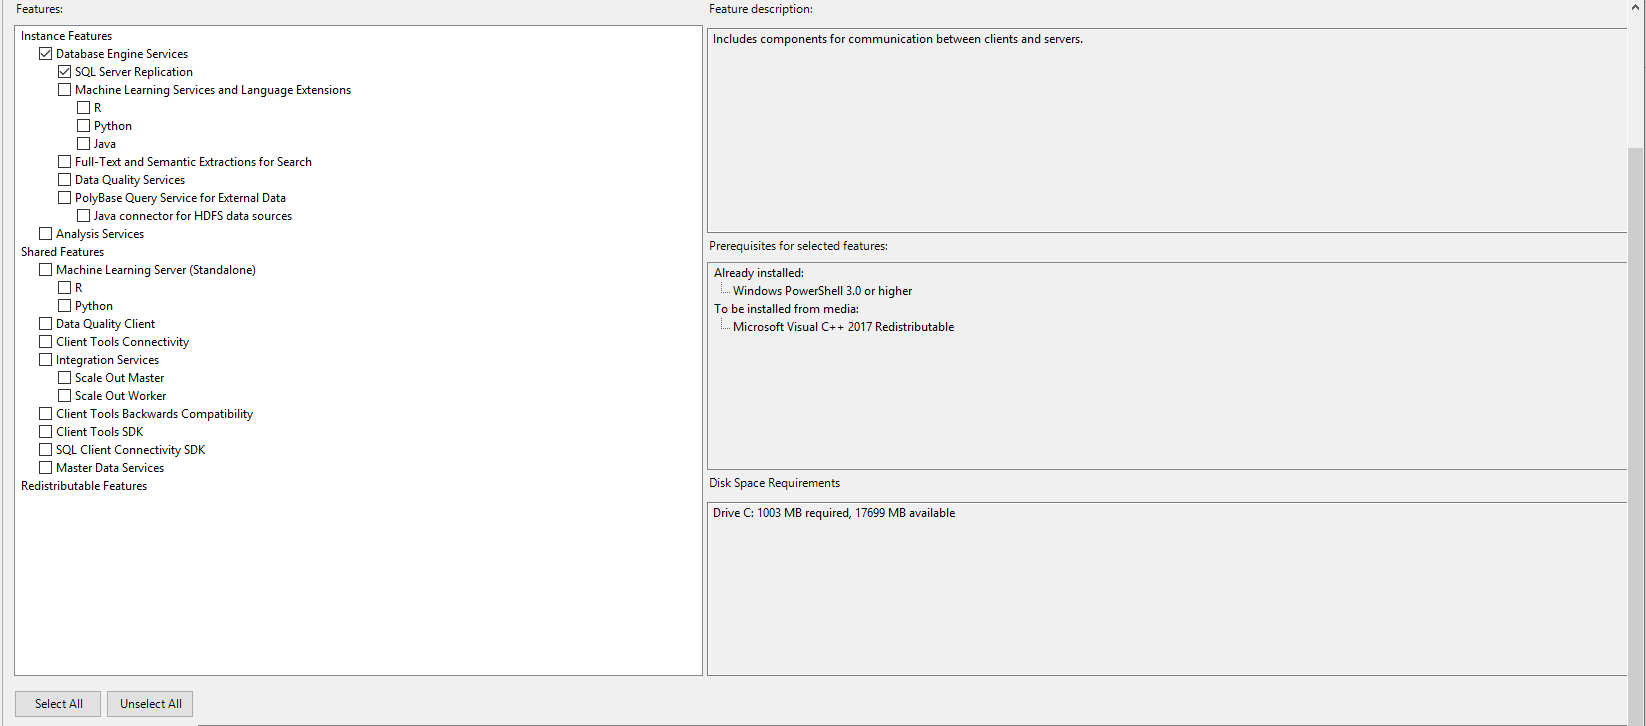
- Select the features you want - Database Engine Services → SQL Server Replication is the only mandatory requirement.

- Follow the instructions on the screen to complete SQL Server image preparation. For detailed instructions or command-line options, please refer to this help doc.
The instance-id must be set as SGSQLSERVER and install location must be “C:\Program Files\Microsoft SQL Server” (both are the default values)
- If your license key is embedded in the ISO (i.e. you were provided with the ISO at the point of purchase, rather than the license key), please follow these steps to obtain the key:
- Run setup.exe from the mounted ISO again
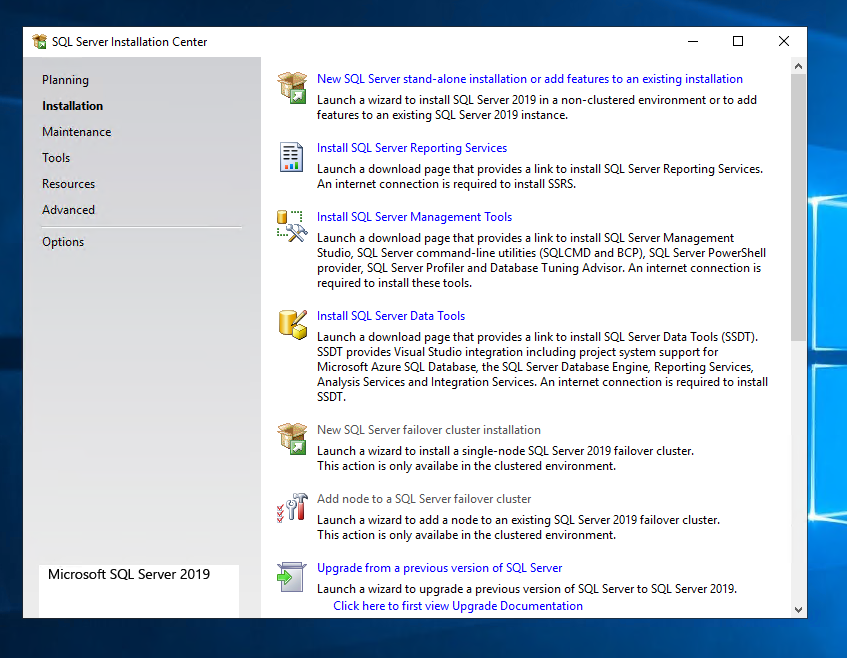
- Select Installation → New SQL Server Standalone Installation or add features to an existing installation

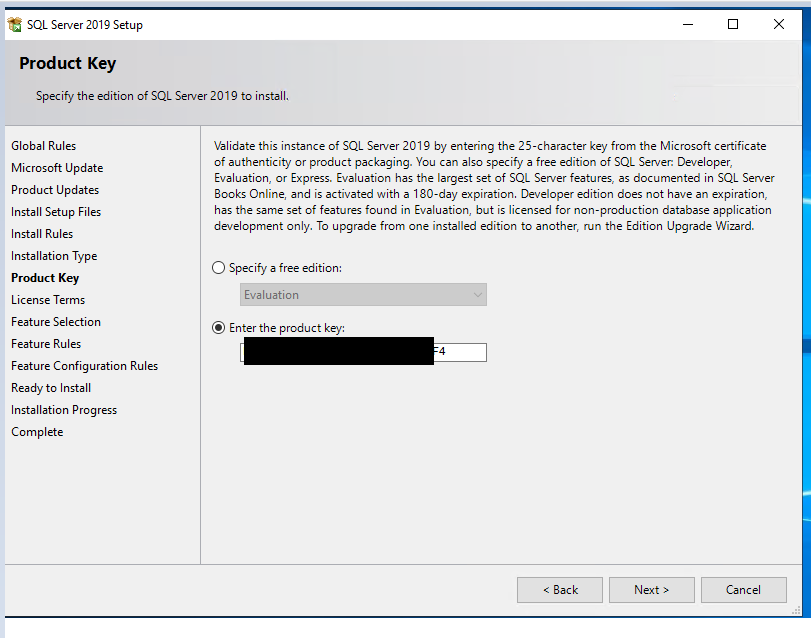
- Accept defaults/click next till you are on the Product Key page, as shown below

- The product key will be displayed here. Copy it out to a safe location (you will be asked to enter this during the cluster creation workflow), and cancel the installation

- Now you can proceed on to the next step
- [Optional] Once installation is complete, you can clean out the installation media (unmount the CD, delete the ISO and exe). If you downloaded this under the Users directory, sysprep will clean them out automatically.
- The image is ready, you can move on to the next step
Install Microsoft® Data Migration Assistant
Download Microsoft® Data Migration Assistant (DMA) from https://www.microsoft.com/en-us/download/details.aspx?id=53595 then install it.
Keep in mind to install DMA under "C:\Program Files\Microsoft Data Migration Assistant\" , which is the default installation directory.
Convert to Template
- [Optional] Run sysprep generalize and shut down the VM.
- Before proceeding, ensure the VM is powered off. A hard power off might cause issues later, please ensure a graceful shutdown.
- Log in to your vCenter
- Right-click on the virtual machine → Template → Convert to Template
Now you are ready to use this in your normal create cloud profile flow! Please refer to this document for detailed instructions on how to create a cloud profile for your SQL Server deployments.
Updated 9 months ago
