MongoDB GUI® - Robo 3T Connection
Learn how to connect your MongoDB® hosting deployments at ScaleGrid to Robo 3T's free, open-source GUI (graphical user interface) tool for MongoDB®.
Robo 3T (formerly Robomongo) is a popular desktop graphical user interface (GUI) for your ScaleGrid for MongoDB® hosting deployments that allows you to interact with your data through visual indicators instead of a text-based interface. This open source tool has cross-platform support and actually embeds the mongo shell within its interface to provide both shell and GUI-based interaction.
Prerequisites
Create Your ScaleGrid Account
If you haven't already, sign up for a free 7-day trial on the ScaleGrid console. Robo 3T is supported on all of our ScaleGrid for MongoDB® hosting plans.
Identify The Instance
The first thing we need to do is identify a machine to install Robo 3T. You can either create a new instance, or pick an existing instance which has access to the ScaleGrid MongoDB® cluster you’d like to connect to.
- For our Bring Your Own Cloud (BYOC) AWS deployments for MongoDB® that are not open to the internet, this may mean selecting an instance that is allowed to connect to the Security Group and also has VPN connectivity to the Virtual Private Cloud (VPC).
- For AWS customers who have their deployments open to the internet, add the identified machine’s IP address to the ScaleGrid cluster’s whitelist.
Install Robo 3T
Robo 3T is available for download here. It’s very important to check your ScaleGrid deployment to ensure you install the Robo 3T version that supports the deployment’s current MongoDB® version, and you can check this link for more information on Robo 3T’s supported platforms. The latest version of Robo 3T at the time of writing is 1.2, which supports MongoDB® versions up to 3.4.
Create Robo 3T User
Create a new user with appropriate permissions for client access. The roles that you choose to assign to the user will depend on your exact use case.
Create a new userWe do not recommend connecting to your MongoDB® deployment using the “admin” user that ScaleGrid provides by default. Instead, create a new user.
Let's walk through two examples of creating users for MongoDB® from the ScaleGrid console. For more detailed instructions, visit this doc:
Database Specific Users
To create simple, per-database, read-write, or read-only users, log into the ScaleGrid console, navigate to the cluster details page, and click on the Databases tab. Then, click on the Manage button beside the database you want to create the user on:

Select the Users tab and click on the New User button:

Fill in the new user’s name and password, then select its role and click Create:
All Database Users
Users created on the admin database with All-Database roles provide privileges that apply to all non-system databases of the deployment. For this example, we will create a new user with read-write access to any database on the cluster.
You can use the ScaleGrid web-shell available on the Admin tab to create such a user:
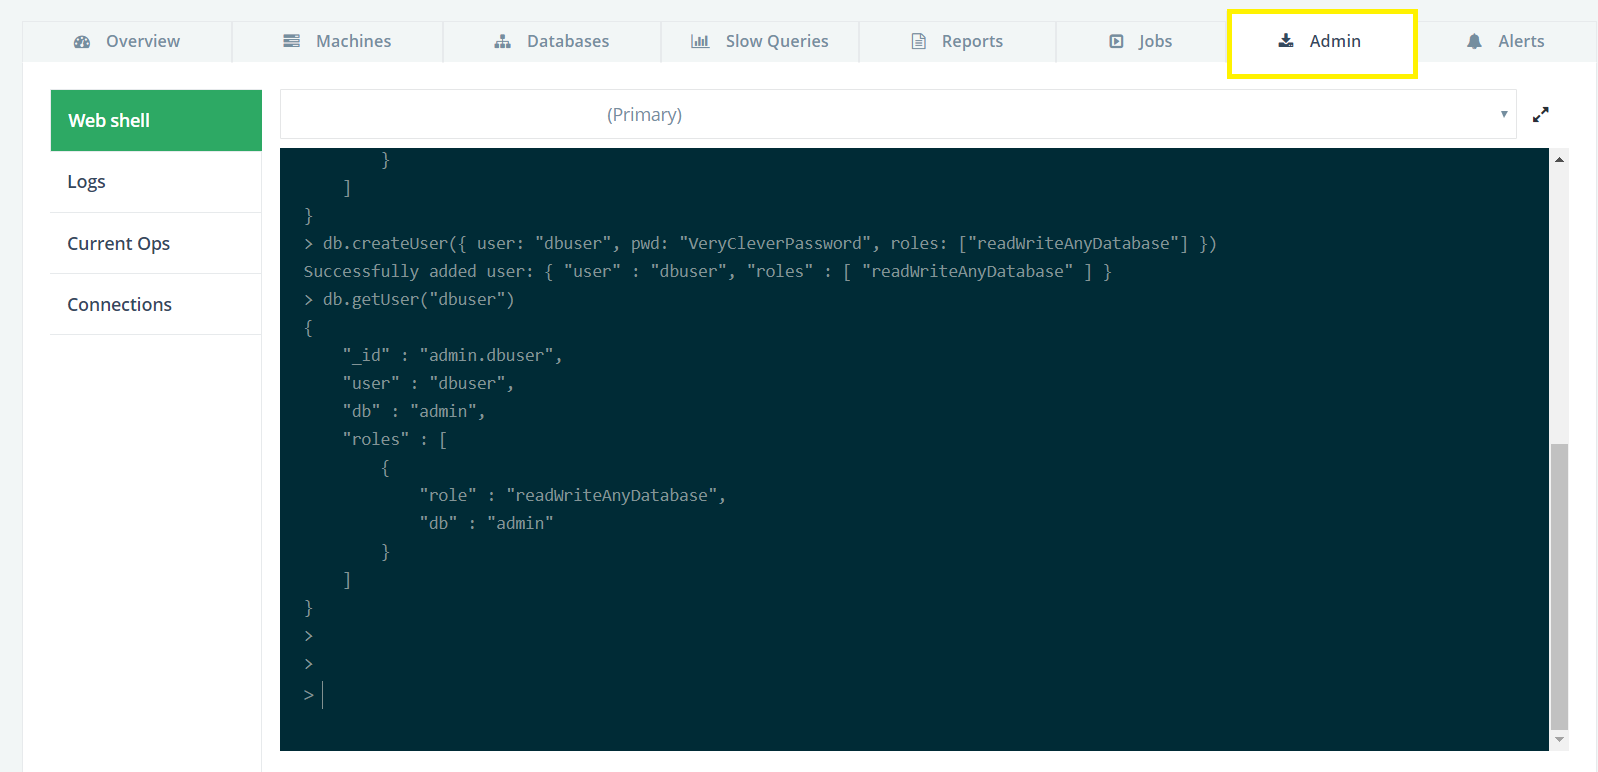
On the MongoDB® web shell, type in the create new user command as shown in the image above and below:
use admin
db.createUser({ user: "dbuser", pwd: "VeryCleverPassword", roles: ["readWriteAnyDatabase"] })
For creating users with more advanced roles and permissions, refer to these resources:
With the prerequisites in place, you can now go to the Robo 3T GUI to continue to connect to your database deployment using the new user you just created to connect to Robo 3T.
Connecting to a Standalone MongoDB® Deployment
Standalone Deployments OnlyThis section walks you through connecting to a standalone deployment only. If you are using a replica set configuration, click here to scroll down to the replica set instructions.
ScaleGrid BYOC and Dedicated plan users often start with a standalone MongoDB® deployment during their free 7-day trial before moving on to replica sets for development and production environments.
Grab Your Connection Details From ScaleGrid
- Go to your ScaleGrid for MongoDB® cluster details page.
- Under the Overview tab, find your Connection String. From here, you can find your database server name and port from your connection string, as identified below:
Connection String: mongodb://admin:<password>@SG-example-1234.servers.mongodirector.com:27017/admin?ssl=true\
Server Name: SG-example-1234.servers.mongodirector.com
Port: 27017
Set Up a New Connection on Robo 3T
- Launch Robo 3T and open the ‘Manage Connections’ window.
- Click on ‘Create’ underneath 'Manage Connections' to set up a new connection.
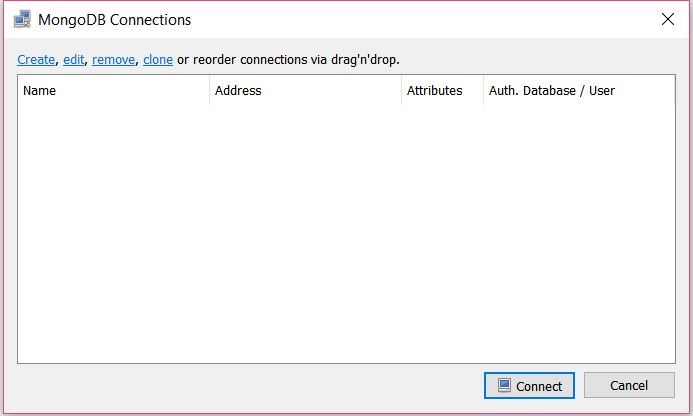
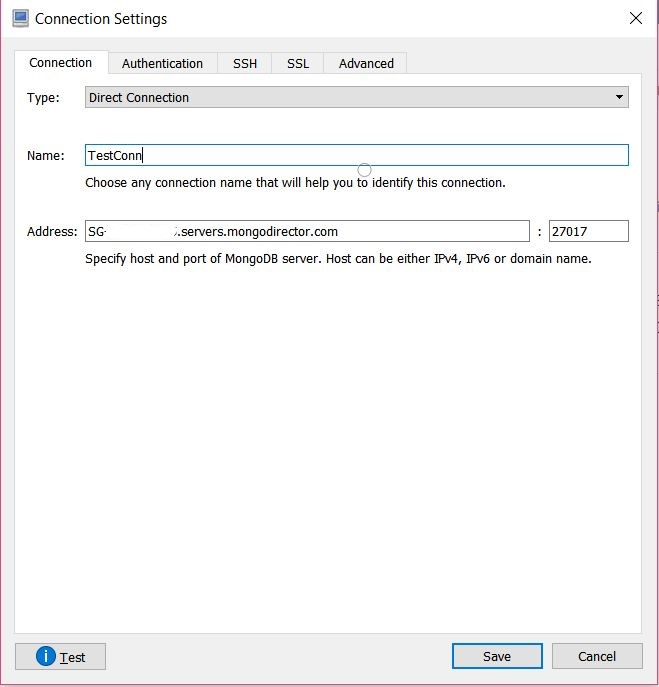
- Once the Connecting Settings window opens, select 'Direct Connection' as the 'Type'.
- Enter a 'Name' for your connection.
- Then, enter the server name into the 'Address' field and port into the 'Port' field as found in your Connection String from the ScaleGrid for MongoDB® cluster details page:
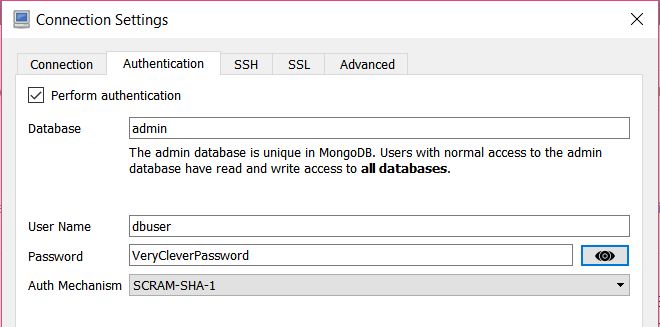
- Next, select the 'Authentication' tab in the top bar of the open 'Connection Settings' window.
- Enter the Database 'Name' that you created your user on.
- Then, enter your user credentials in the remaining fields:
- If SSL is enabled on your cluster, then click on the 'SSL' tab and configure as shown below:
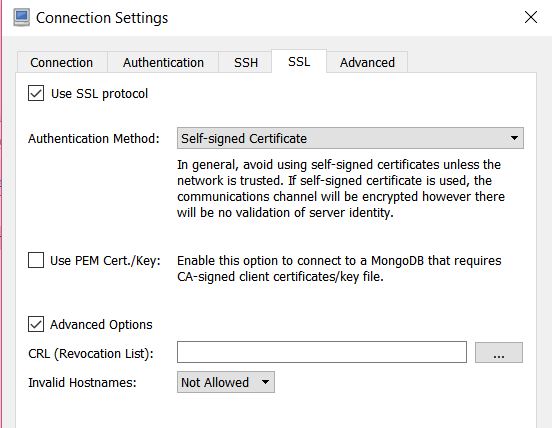
SSL SettingsBy default, ScaleGrid provides self-signed certificates, however you may ask us to buy them on your behalf.
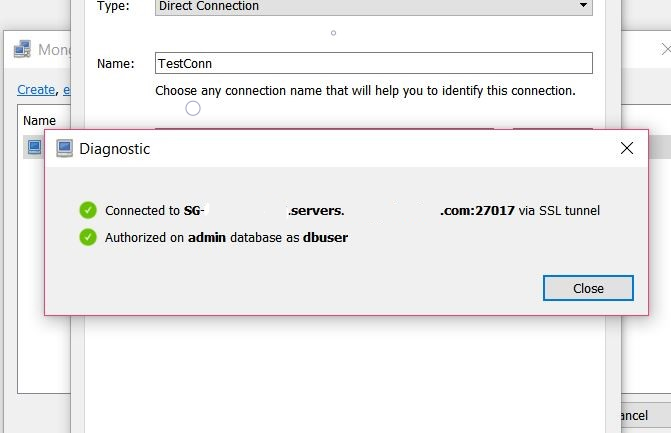
- Click on ‘Test’ to test the connection. Robo 3T should be able to connect successfully.
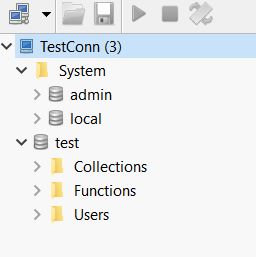
- Save the connection and then double-click on it to see your database:
Connecting to a Replica Set Deployment
Replica Set Deployments OnlyThis section walks you through connecting to a replica set deployment only. If you are using a standalone configuration, click here to scroll up to the standalone deployment instructions.
Follow these steps to connect your Shared (all by default), Dedicated, and BYOC replica set deployments for MongoDB® to Robo 3T.
Grab Your Connection Details From ScaleGrid
- Go to your cluster details page.
- Under the Overview tab, find your Connection String. From here, you can find your database server name(s) and port(s) list from your connection string, as identified as below:
Connection String: mongodb://admin:<password>@SG-example-170.servers.mongodirector.com:47100,SG-example-171.servers.mongodirector.com:47100,SG-example-172.servers.mongodirector.com:47100/admin?replicaSet=RS-example-0\&ssl=true
1st Server Name : SG-example-170.servers.mongodirector.com
1st Port: 27017
2nd Server Name : SG-example-171.servers.mongodirector.com
2nd Port: 27017
3rd Server Name : SG-example-172.servers.mongodirector.com
3rd Port: 27017
Replica Set Name : RS-example-0
Set Up a New Connection on Robo 3T
- Launch Robo 3T and open the ‘Manage Connections’ window.
- Click on ‘Create’ underneath 'Manage Connections' to set up a new connection.
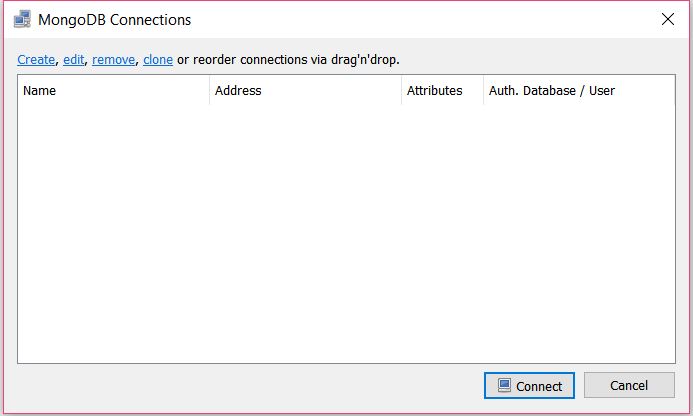
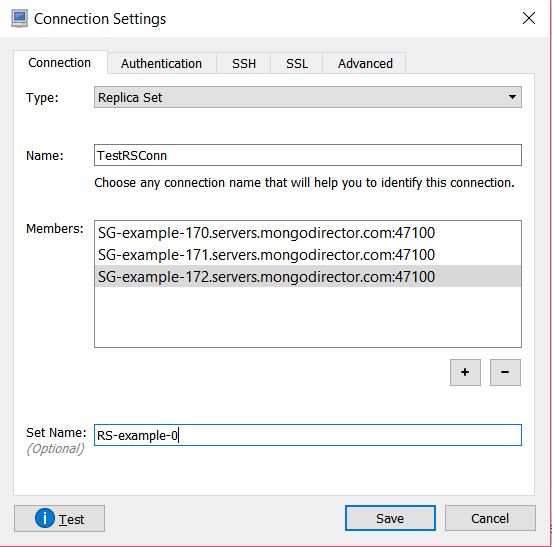
- Once the Connecting Settings window opens, select 'Replica Set' as the 'Type'.
- Enter a 'Name' for your connection.
- Using the 'Server Name(s)' and 'Port(s)' identified above in your Connection String, enter them individually by clicking the + sign under the 'Members' box.
- Enter your 'Replica Set Name' into the 'Set Name' field.
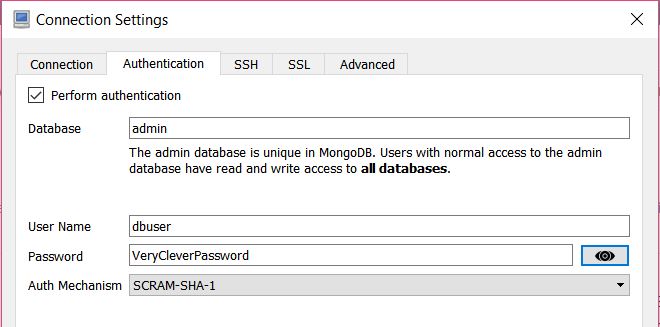
- Next, select the 'Authentication' tab in the top bar of the open 'Connection Settings' window.
- Enter the Database 'Name' that you created your user on.
- Then, enter your user credentials in the remaining fields:
- If SSL is enabled on your cluster, then click on the 'SSL' tab and configure it as shown below:
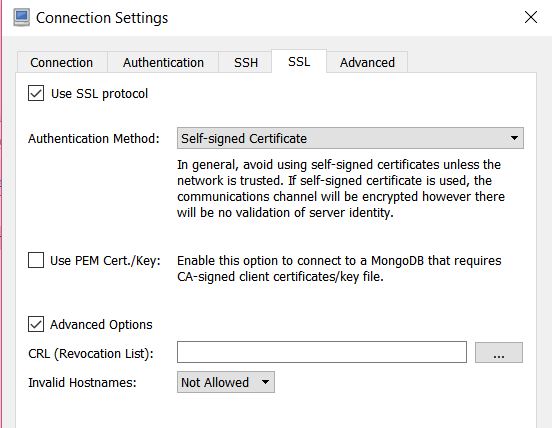
SSL SettingsBy default, ScaleGrid provides self-signed certificates, however you may ask us to buy them on your behalf.
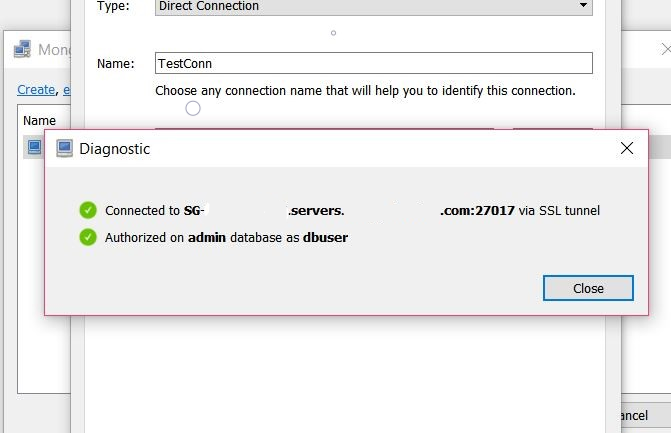
- Click on ‘Test’ to test the connection. Robo 3T should be able to connect successfully.
- Save the connection and then double click on it to see your database and establish a connection.

Troubleshooting
If you’ve completed all of the above steps for either a standalone or a replica set deployment and your connections aren’t working, here are a few things to try out:
- Ensure you can connect from the client machine to the server using mongo shell. The syntax for connection is available on the ScaleGrid MongoDB® cluster details page in the Overview tab under the heading ‘Command Line String’.
- Ensure that the MongoDB® version is supported by the Robo 3T you are using.
- Ensure that the credentials you’re using to connect are correct.
- Check if the deployment has SSL enabled and you have configured it correctly.
If you have any issues, get in touch with us at [email protected] and we would be happy to help you out!
Updated 9 months ago
