Controller Installation
This page has detailed instructions on how to set up a ScaleGrid Enterprise installation. If you are looking for a simpler, less verbose guide, please have a look at our Quick Start Guide
In general, we recommend setting up a highly available ScaleGrid Enterprise installation, using 3 VM(s). For a true highly available install, consider distributing these machines across Availability Zones/Fault Domains/Datacenters to ensure a majority of the instances do not go down at the same time. However, for development and test purposes you can also install ScaleGrid Enterprise as a standalone, on a single VM.
Please review the prerequisites and provision the VM(s) before proceeding further.
Setup Input Parameters
This section covers the information that'll be required to complete the ScaleGrid Enterprise server installation. Please have these details handy before proceeding with installation.
Node Information
Please enter the address (IP or DNS) of all nodes that will participate in the cluster.
We strongly recommend using internal/private addresses, if possible.
Note: Each node must be able to route communication to all the other nodes.
Enter address of node 1:
Enter address of node 2:
Enter address of node 3:
This set of prompts appear only for a multi-node setup. It take in the address of the nodes that’ll form the ScaleGrid Enterprise cluster. These addresses will be used only to communicate between the 3 nodes - so if nodes are able to communicate via a private address, we recommend using that.
Verify SSH Access is configuredYou must make sure passwordless SSH access is configured for all the nodes before proceeding further.
Review the SSH configuration section, then run
ssh <ip-address-of-each-node> hostnameto validate access. If correctly configured, this command should print out the hostname of each node.
Verify connectivity between nodesIf your VMs are behind a security group or external firewall, you must allow communication between the nodes on TCP ports 3306, 4369, 5671, 5672, 15672, 25672, 55672, 35672 - 35682 and UDP port 5405.
Do the nodes have a different external/public IP configured? [y|n]
This set of prompts allow you to specify public IPs associated with the node(s). Database machines will use these addresses to communicate back with the controller.
If your node(s) do not have an external/public-IP configured, or you already entered the public IPs at the beginning of the installation - answer 'n' or 'no' here. The following prompts will be skipped, and all communication will be via the IPs you entered earlier.
If your controller(s) do not have public IPs, the subnet in which you deploy your databases must be able to route traffic to your controller node(s) using the private IPs you entered earlier.
Please enter the public IP for sgcontroller1 (<Private-IP>):
Please enter the public IP for sgcontroller2 (<Private-IP>):
Please enter the public IP for sgcontroller2 (<Private-IP>):
You will see these prompts if and only if you answered yes to the previous question. Please enter the corresponding public IPs here.
Note: If you are doing a standalone installation, you will see this prompt instead.
Please enter the public IP or press enter to use the local ip as the main access point for this box. [\<Private-IP\>][\\<Private-IP\\>]\:
End-point Details
Please enter the DNS name setup for the ScaleGrid controller (e.g databases-contso.com). This will be the end-point customers access.
For a multi-node setup, you must set up a single DNS mapping that your end-users will use to access ScaleGrid services. Please enter the details here. If you need help with setting up such an end-point, please reach out to ScaleGrid Support.
For a single node standalone installation, you will not see this prompt.
SMTP details
This set of prompts takes the inputs required to enable ScaleGrid Enterprise Server to send out emails. Emails may be sent for system warnings and failures, for alerts configured on particular metrics and also for notifications about database cluster actions.
- SMTP Host : This is the hostname of the server where your email server is hosted. This must be resolved from all the ScaleGrid Enterprise Server node(s)
- SMTP User : The username through which ScaleGrid Enterprise Server can authenticate with your email server. We recommend creating a separate user for ScaleGrid Enterprise Server.
- SMTP Password : The password for the SMTP user. If you need to change this after installation please contact ScaleGrid support ([email protected])
- Is SMTP-over-SSL enabled? [y|n]: If you answer ‘y’ or ‘yes’ to this question, all communication to your email server will be encrypted. If you answer ‘n’, all communication will be over clear-text.
Notification Alias
Enter a email alias to which the ScaleGrid Enterprise Server can send out important system emails (e.g. Alerts, warnings etc)
Whenever a system needs to send an alert, an email will be sent to this address. This helps ScaleGrid Enterprise Server administrators take proactive action to avoid issues with your database. Please ensure this is a valid email address that is reachable from your email server.
If your ticketing system allows raising tickets via email, we recommend using that address here.
ScaleGrid Controller Backup
Enter a location on the local filesystem to store database backups or press enter to accept default location [/var/backup/scalegrid]
It is important to take regular backups of your ScaleGrid Enterprise Server. For this reason, we have set up automated backups that run every night. We strongly recommend these backups be stored on an NFS share or a different volume, and not on the same volume as your root file system.
You can choose to accept the default path by hitting enter, or entering the absolute path to the folder where you wish to store the backup. If the path does not exist, the installation script will create the folder hierarchy.
DNS Details
ScaleGrid Enterprise Server uses AWS Route53 to automatically assign DNS names to your database servers. We need the following details of the Route53 setup you plan to use.
- DNS Zone ID:
- DNS Suffix:
- DNS IAM user API Key:
- DNS IAM Secret Key:
If you need help with setting up a sub-domain on Route53, please check our other help doc here.
Alternately, you can also use the Advanced Installation options to set up a ScaleGrid Enterprise Installation that does not create DNS entries for database machines. In that case, these prompts will be skipped and you will see the below prompt instead -
ScaleGrid Enterprise Server generates self-signed certificates for &#xNAN;*.domain. Please setup the domain name you plan to use.
5. DNS Suffix for the domain (Example: .dbservers.mycompany.com):
This suffix will only be used to generate SSL certificates. If you are planning to set up DNS entries outside of the ScaleGrid system, please provide the DNS Suffix you plan to use. If you are not planning to use any DNS names at all, you can enter any domain name, as long as it doesn't violate domain naming rules.
Service Provider Integration API Details
These prompts will be enabled if and only if you are installing the Service Provider Integration Package.
Please enter a comma-seperated list of CIDRs from which the integration API will be used, like 13.251.4.63/32:
The integration API can only be used from whitelisted clients. So please provide the list of CIDRs to whitelist.
Locating Logs
The installation logs are located under the user’s home directory. The path is printed at the start of installation - in case of any error, please raise a support request ([email protected]) and attach this log. By default, the path would be ~/scalegrid-server-install.log.
Note: In case of a multi-node install, please include the log file from each node.
Installation
Once the machines are set up, please confirm that you have the following:
- For a multi-node install, ensure SSH access between the nodes works simply as
ssh <address>. Review the User Configuration and SSH configuration section if it doesn't. - Verify the required ports are open between the nodes
- Get the download link from ScaleGrid Support
Now you are ready for installation!
Quick Installation
Please run the following script to start the installation of a 3-node ScaleGrid Enterprise cluster:
sudo yum install -y wget unzip
mkdir sgsetup
cd sgsetup
wget <the download URL shared with you>
unzip scalegrid_installer_x.y.z.zip
chmod u+x scalegrid-installer.sh
./scalegrid-installer.sh
Advanced Options
There are a few ways you can customize the ScaleGrid Enterprise installation. This is controlled by the flags you pass to the installation script
--standalone
By default, the installation script will set up a highly available ScaleGrid Enterprise installation, using 3 VM(s). Use this flag to perform a standalone installation instead
We do not recommend using a standalone installation in production.
-
--ha
Specify this flag to explicitly request a highly available installation. This is the default. -
--download-sgRepo-locally
Under normal operation, the ScaleGrid controller requires outbound internet access to access some resources from S3 buckets and Cloudflare CDN. If you are planning to deploy the controller in an air-gapped environment, or wish to avoid a dependency on S3, specify this flag to download all resources from S3/CDN(s) during the install phase. All resources will be served locally after the installation. -
--noDNS
Under normal operation, the ScaleGrid controller requires outbound internet access to use AWS's Route-53 service. It is used to automatically create DNS entries for the database machines. Specify this option if you do not want ScaleGrid Enterprise Server to create DNS entries. Some HA deployments will require virtual IPs instead.
Note: If you would like to use a different DNS service, please reach out to ScaleGrid Support
--externalize-monitoring
By default, the ScaleGrid installation scripts will set up a MongoD®B cluster to hold telemetry data. However, in a large production setup, storing telemetry data can be a resource intensive operation. In such cases, we recommend setting up the MongoDB® cluster externally. If you wish to do so, please specify this flag.
You can use any combination of flags, to customize the installation as needed.
For example,
./scalegrid-installer.sh --standalone --noDNSwill create a standalone installation, that doesn't use Route-53../scalegrid-installer.sh --download-sgRepo-locallywill create a 3-node installation, that serves all files locally, but uses Route-53 to create DNS entries for database machines./scalegrid-installer.sh --download-sgRepo-locally --noDNSwill create a 3-node installation, that serves all files locally, and uses virtual IPs, instead of setting up DNS entries
Inputs
The installation process will prompt you for input at various points. It will require -
- The private and public addresses of the nodes on which ScaleGrid Enterprise must be set up
- DNS Mapping for the controller nodes
- An email address where health alerts (e.g. a deployment is down) can be sent. This can be used to integrate with your ticketing system.
- SMTP details, to be used to send emails (to the configured email, as well as to end users)
- [Optional] Route-53 Setup, to be used to set up DNS names for the machines. You will not be asked for this information if you set up a “noDNS”/Virtual IP based installation.
If you need help with the inputs, please take a look at the Setup Input Parameters section of this help doc.
Outputs
The installation process will provide you with the following outputs, that you must save (installation will require you to acknowledge saving these, before it proceeds/exits)
Root User Password
#############################################################################
# The root user is [email protected] with password XXXXXXXXXXXXXXXX   #
# Please save this password - it can not be recovered                       #
#############################################################################The root user is to be used only for administrative purposes. Please do not use this user for regular usage.
We would strongly recommend enabling 2-FA on this account immediately after installation completes.
Service Provider Integration API Secret
This will be provided if and only if you are installing the Service Provider Integration API package.
============================================================================
The authentication token for the integration API is XXXXXXXX
Please save this in a secure location before proceeding - it can not be recovered
============================================================================
If you are installing the Service Provider Integration API package, please note this secret. It will be required for post-installation steps.
Post-Installation Steps
Setup 2-FA on the root account
Once the installation is complete, you must enable 2-FA on the root tenant.
To do so, please log in to your controller with the user name and password output during the installation process. You will be redirected to the User management page, where you can change your password, and set up two-factor authentication.
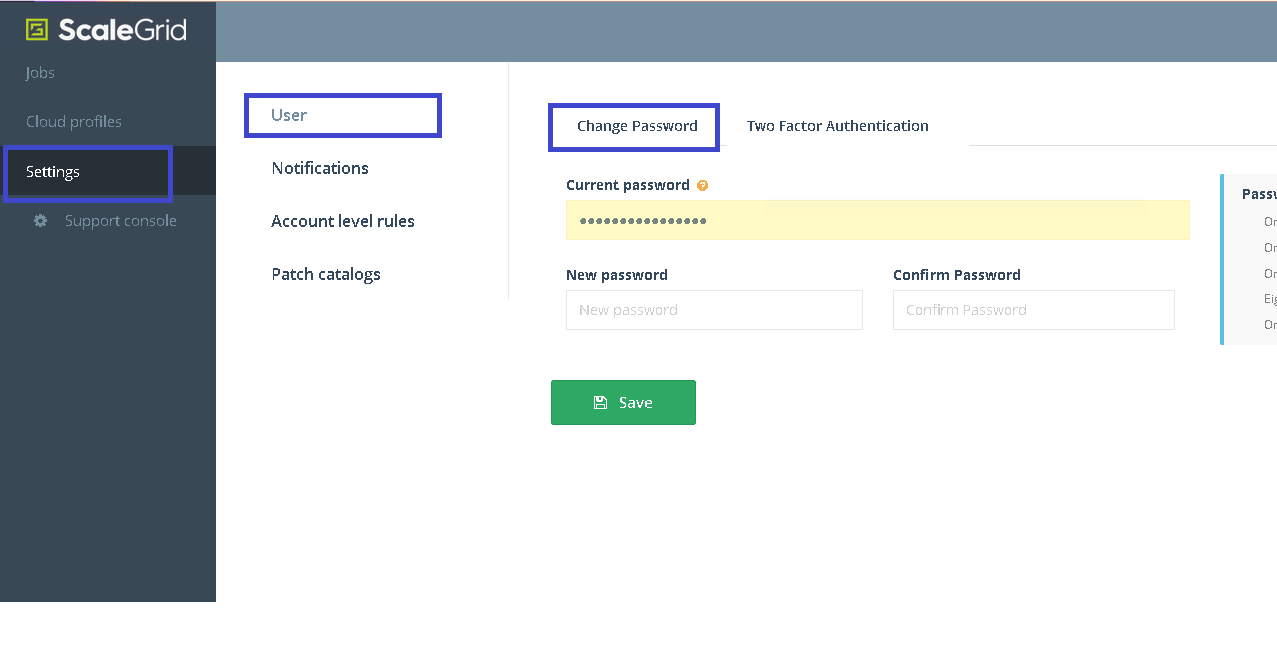
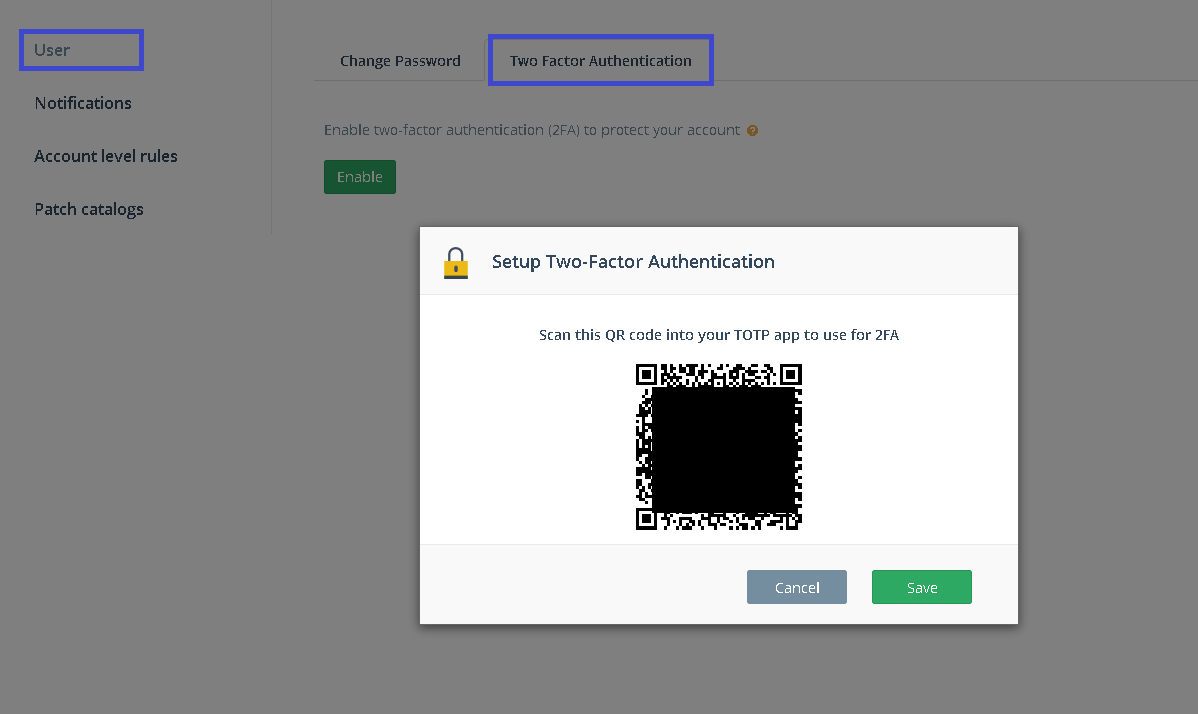
Detailed instructions on how to set up two-factor authentication can be found here.
[Optional] Setup SAML Integration
If you wish to use SAML based authentication with your ScaleGrid cluster, please follow these steps after you have set up 2-FA on the root account.
- Log-in to your ScaleGrid account as the root user
- Navigate to the Support Console from the left-hand menu (or you can point your browser to
https\://<your-endpoint>/support/showConsole
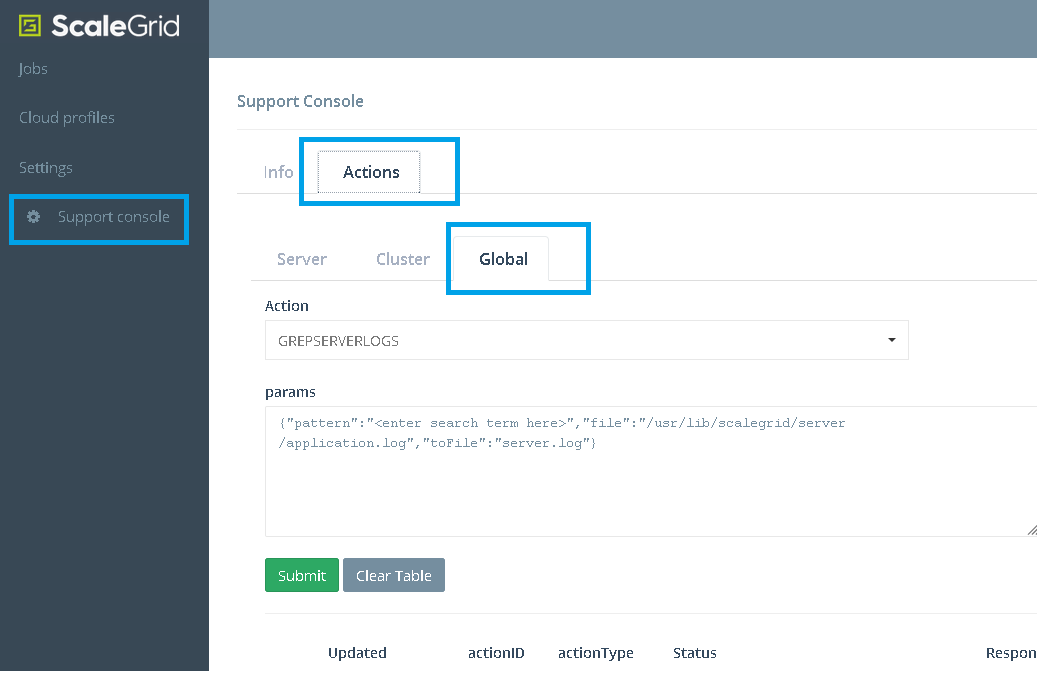
- Move to the Actions → Global tab
- Search for SAML in the drop-down menu to find the SETUP_SAML_DOMAIN support action
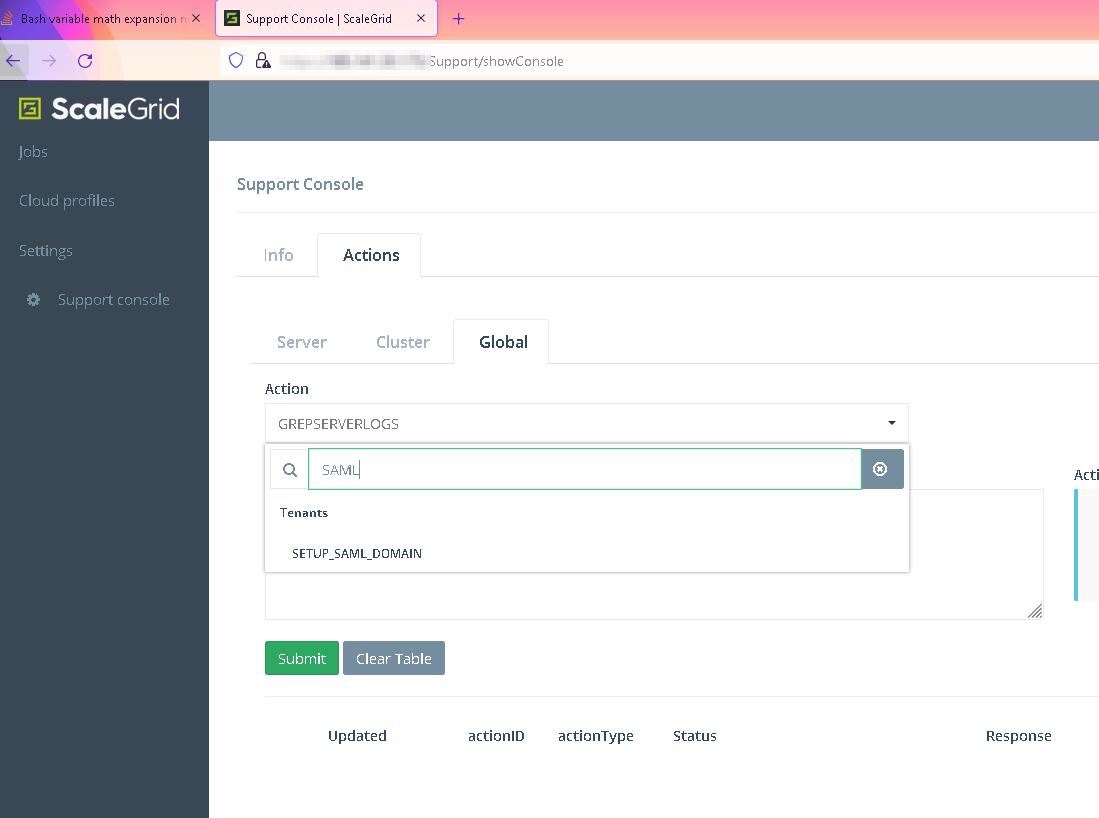
- Click SAML Configure, and enter the details of your SAML setup.
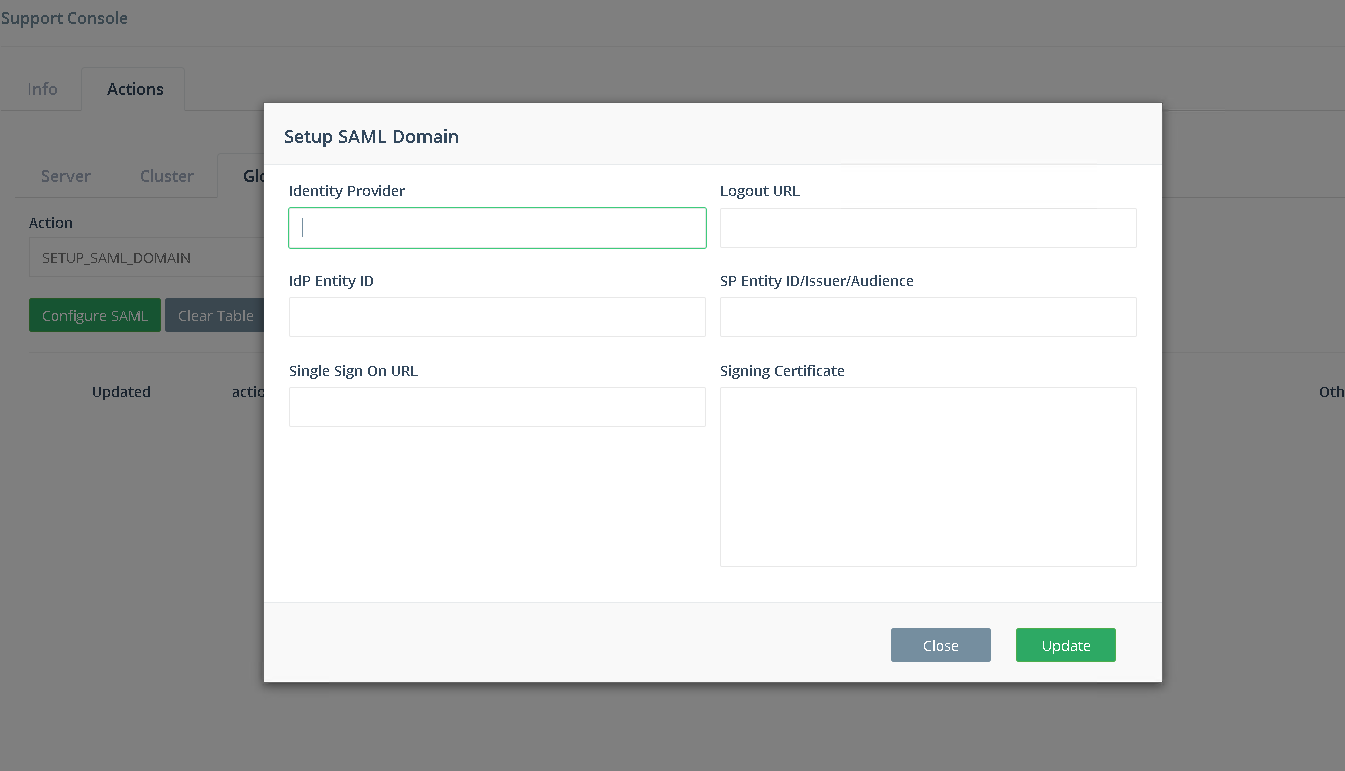
- Click on ‘Update’ - it should report success as under. If you encounter any issues, please reach out to ScaleGrid support.
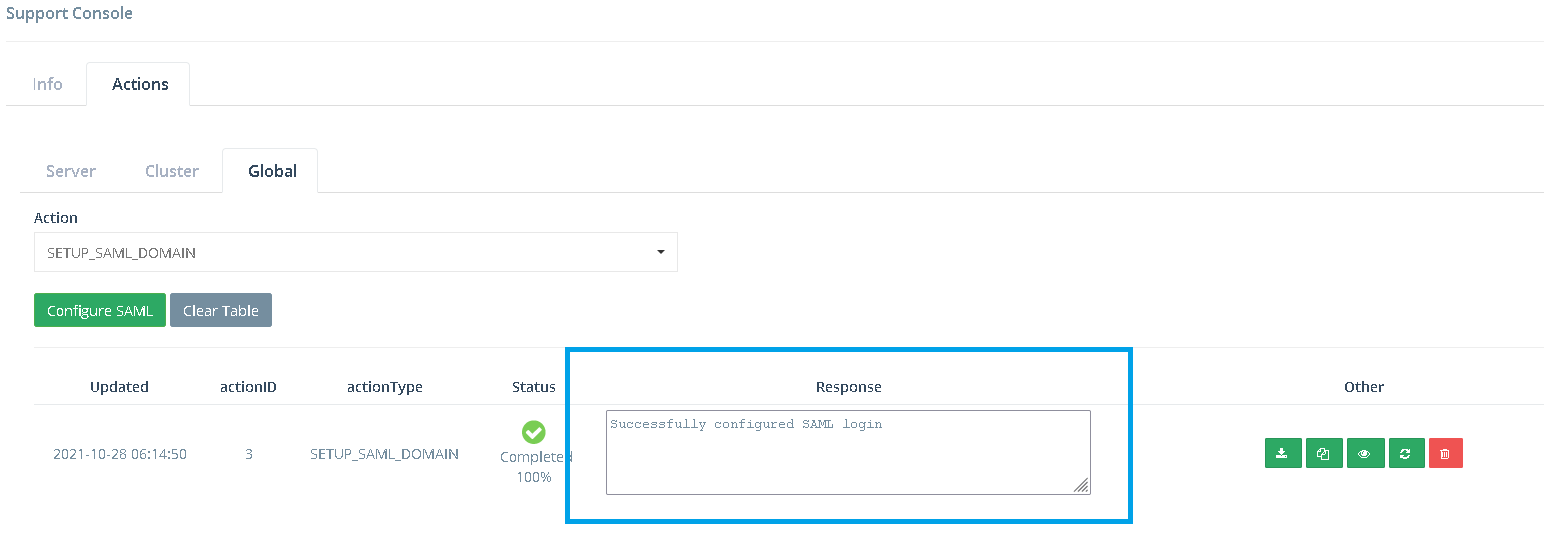
If you did not specify the --externalize-monitoring flag during installation, your set up is complete and you are ready to use your ScaleGrid Enterprise controller! If you did specify the flag, please continue on to the next step.
Prepare a MongoDB® Cluster for Telemetry Data
If you have installed the Service Provider Integration package, please skip this section and reach out to ScaleGrid support for instructions on how to set up the MongoDB® cluster.
ScaleGrid uses MongoDB® to store telemetry data. Once your ScaleGrid Enterprise cluster has been set up, please log in to it and create a MongoDB® cluster. To do this, follow these instructions:
- Register a new tenancy, to hold the MongoDB® deployment.
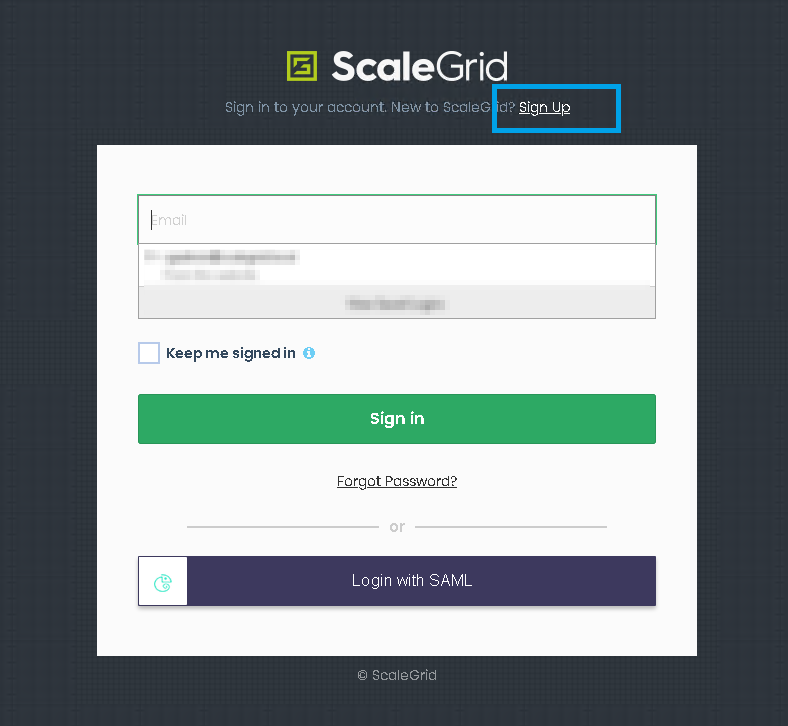
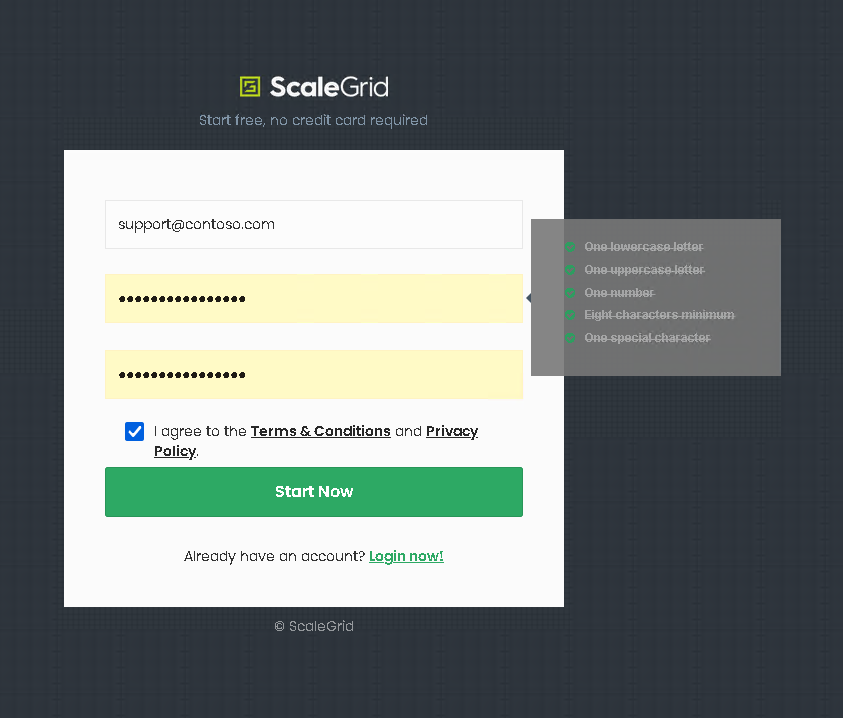
- Log-in, and setup a cloud profile.
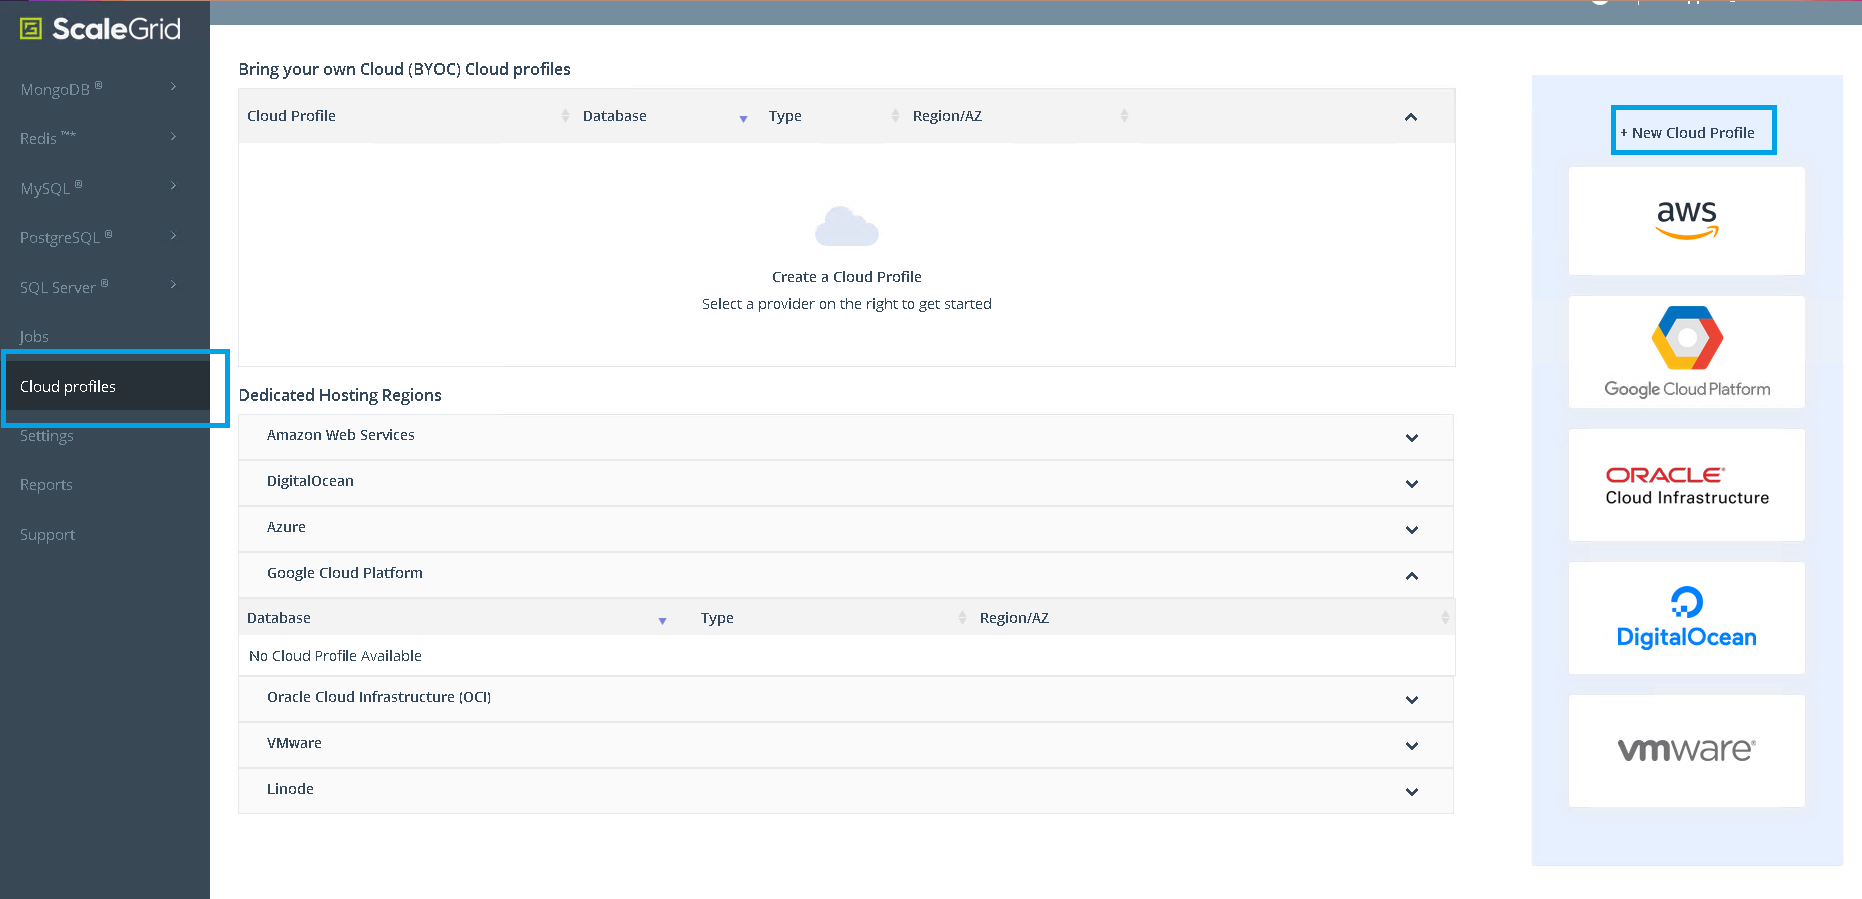
- Create a new MongoDB® cluster, with SSL and disk-encryption enabled.

You must open the firewall/security groups so that all the controller machines are able to communicate with this MongoDB® cluster (on TCP port 27017).
Setup Monitoring DB
Please ensure you have a functional MongoDB® cluster before proceeding further.
-
Log in as a support user (or as the root user, if you did not create a support user)
-
Go to the support console and set the user to the account you used to create the MongoDB® deployment
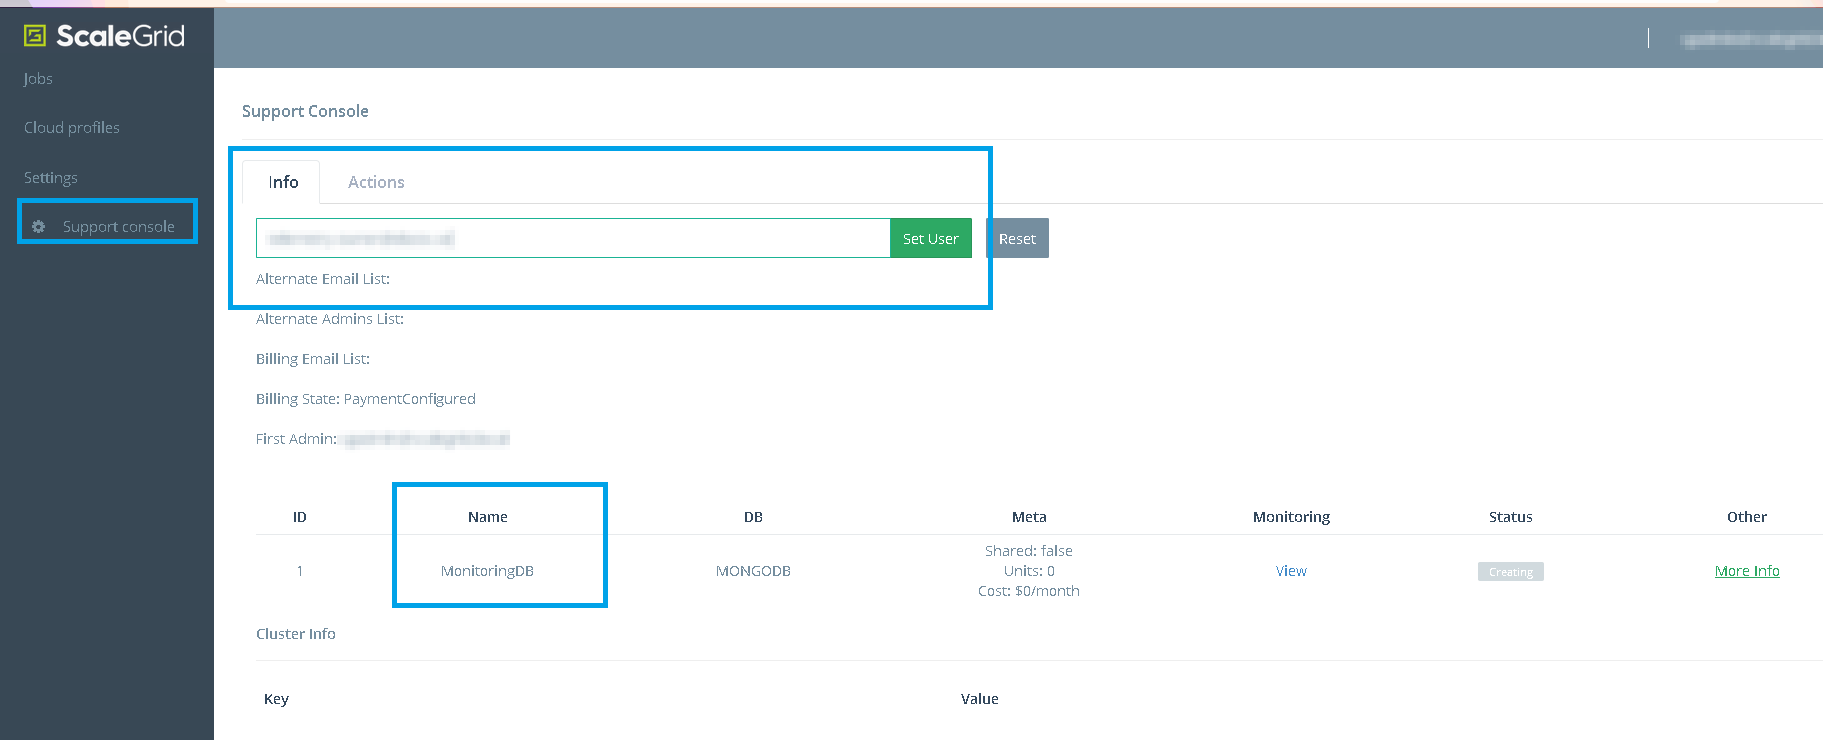
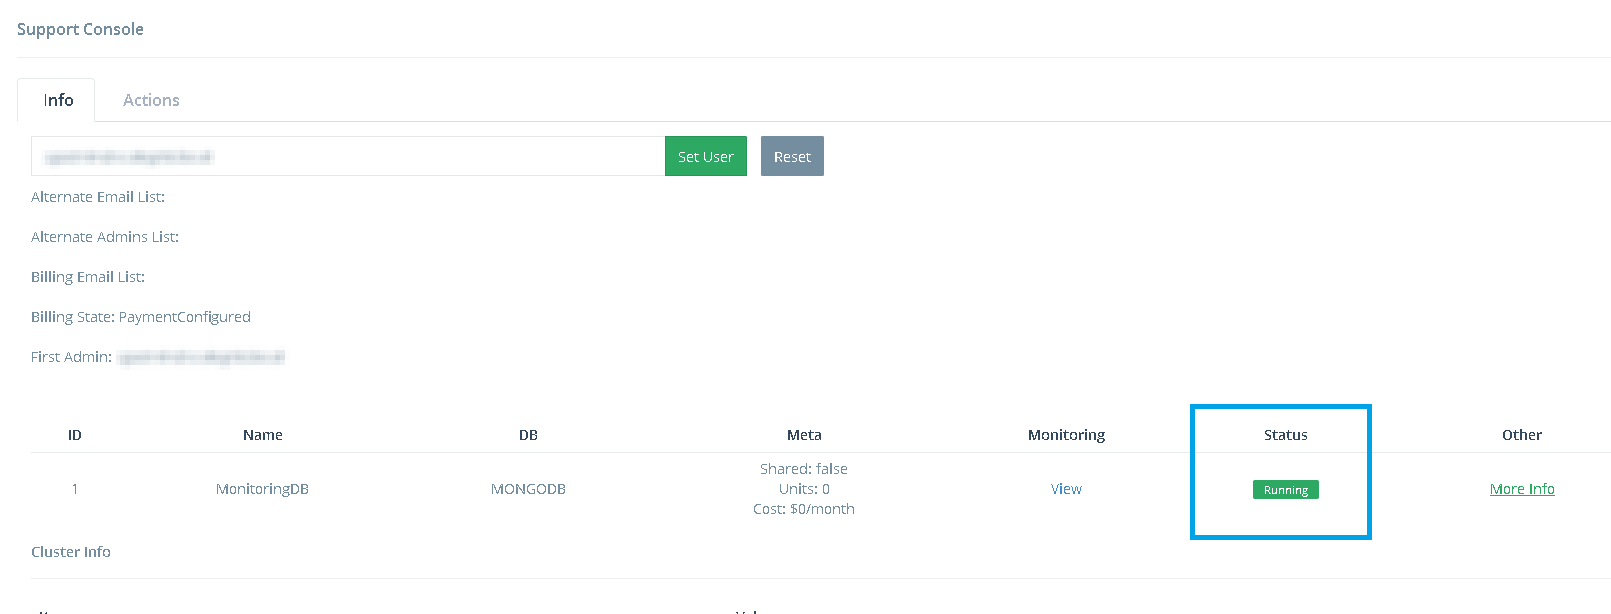
- You will see the MongoDB® cluster. Make sure it is in Running state.
- Navigate to Actions → Cluster and search for SET_
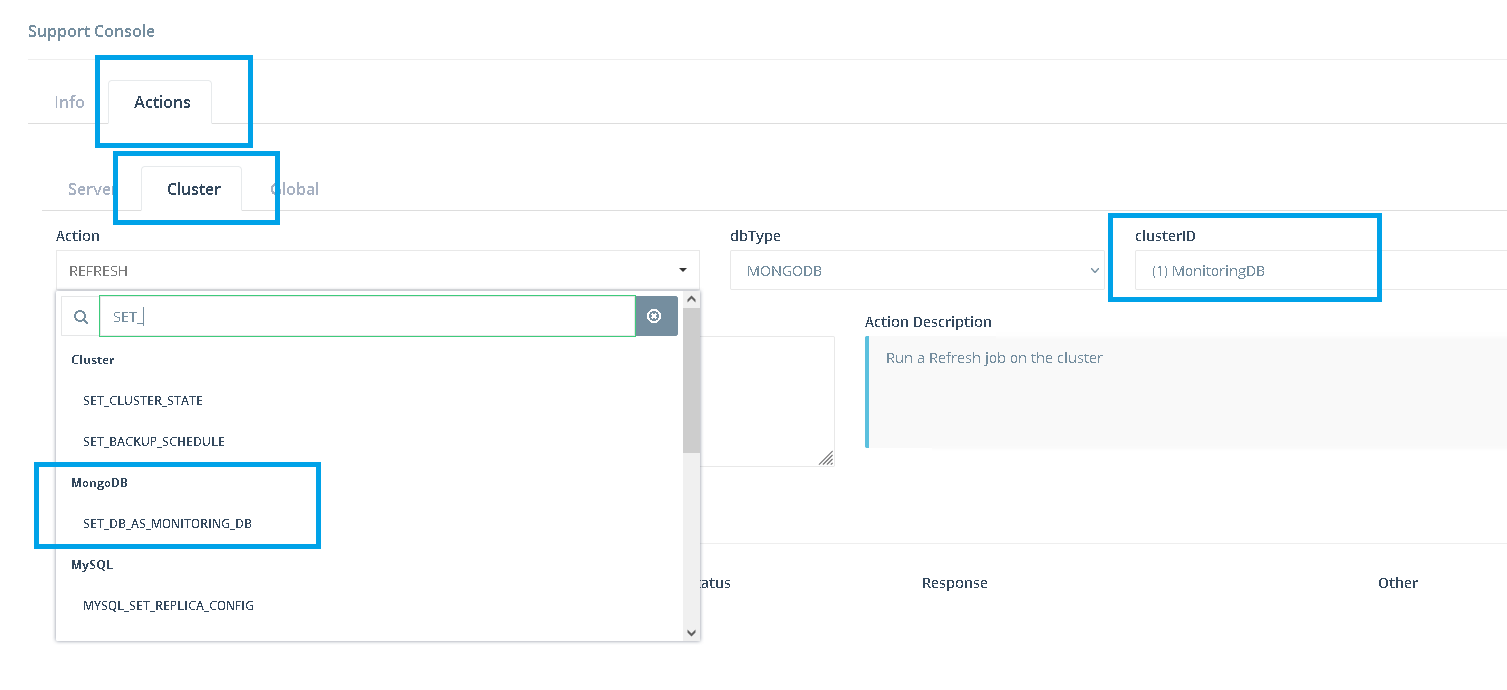
- You will find the SET_DB_AS_MONITORING action. Submit it - no input is required.
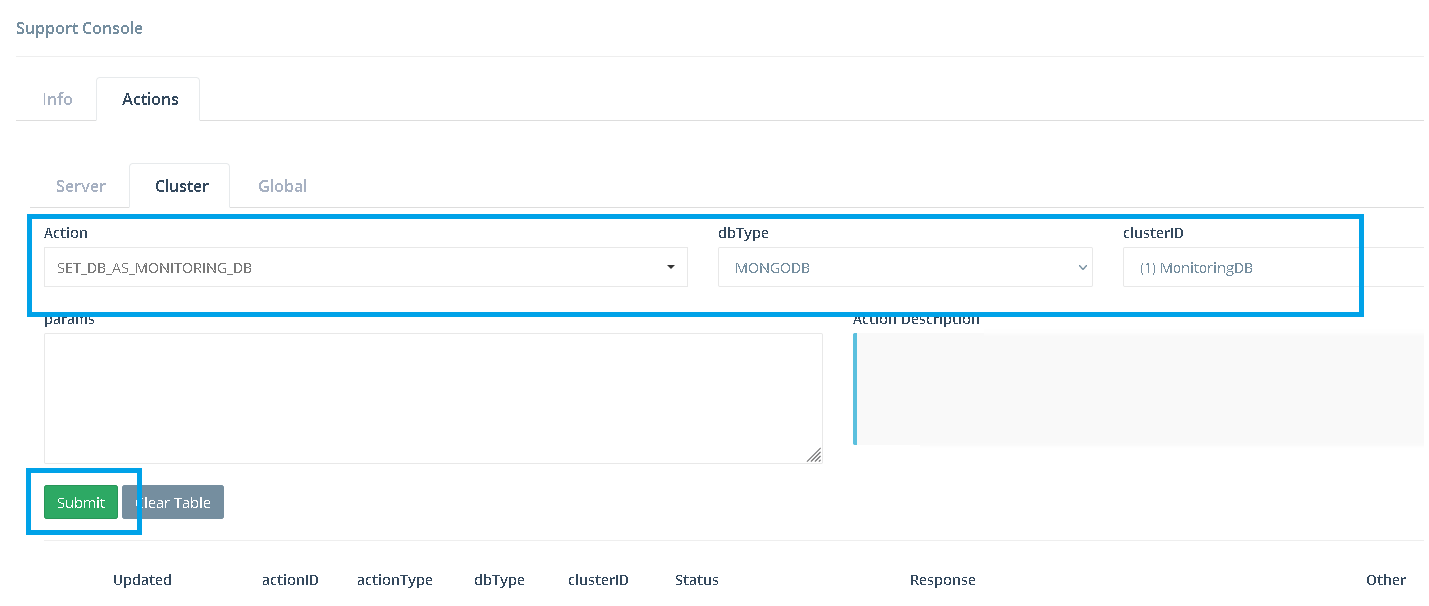
- The action should report success as under. If you hit any errors, please contact ScaleGrid Support

Setup Indexes for Monitoring DB
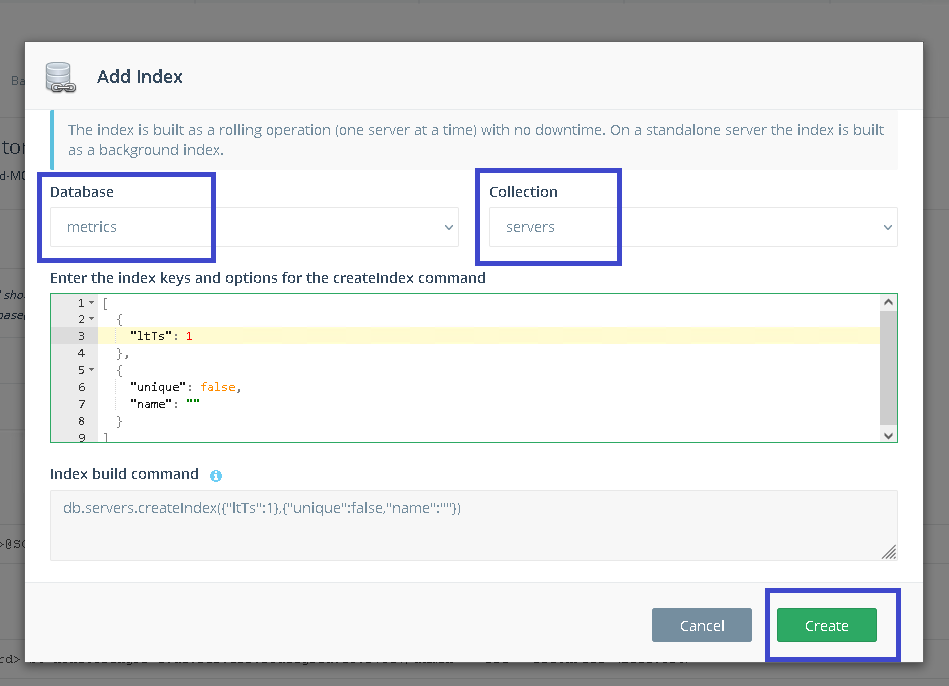
Once the monitoring-DB has been set up, navigate to the cluster-details page of the MongoDB® cluster, and click on the Add-Index icon.
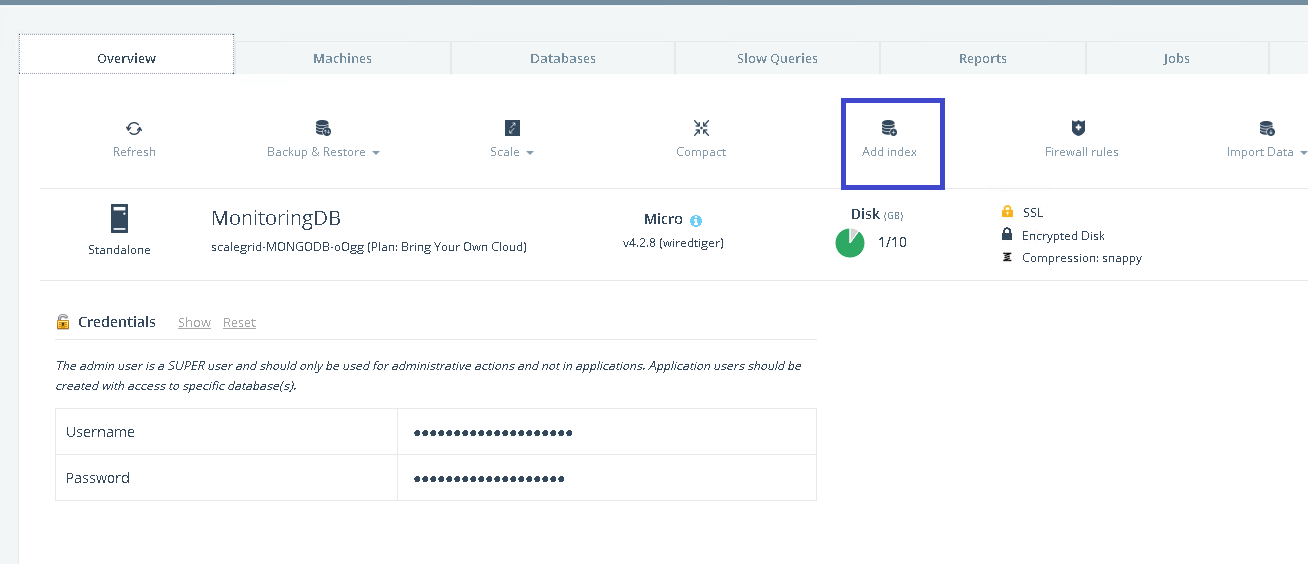
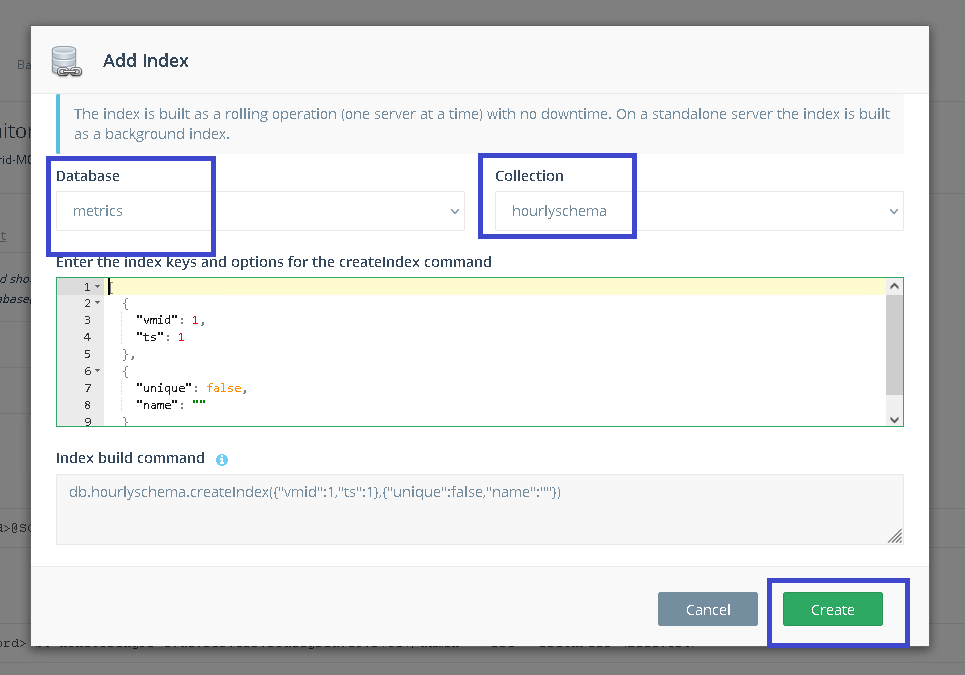
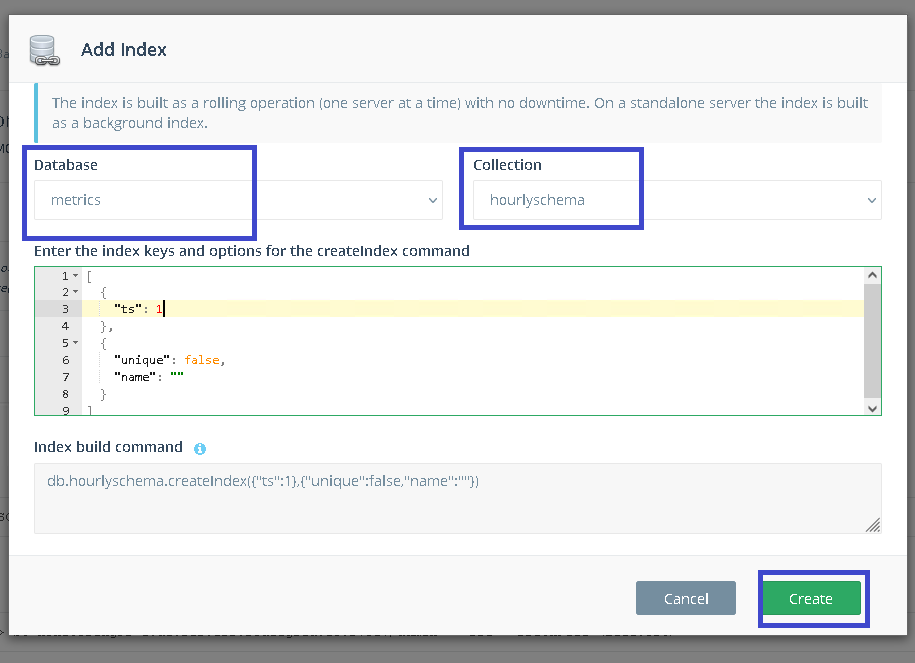
We need to add three indexes to the metrics database →
{"vmid": 1, "ts": 1}on the collectionhourlyschema
{“ts”: 1}on the collectionhourlyschema
{“ltTs”: 1}on the collectionservers
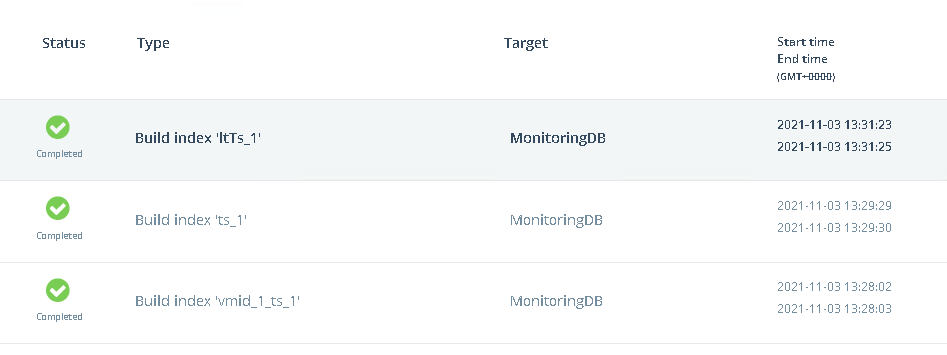
Make sure all the 3 index build jobs have succeeded.
And that’s it! Your ScaleGrid Enterprise deployment is now ready to use!
Updated 9 months ago
