Import MongoDB® Data From a Remote Server
See how easy it is to import your MongoDB® data into your new MongoDB® clusters at ScaleGrid.
Ready to upgrade to fully managed hosting for MongoDB®? Easily migrate your MongoDB® deployments to ScaleGrid, and we'll take those time-consuming management tasks off your plate so you can get back to product.
MongoDB® Import Prerequisites
Here are the things you'll need to import your MongoDB® data to ScaleGrid:
- Your remote server name, port, and SSL config.
- Name(s) of databases you wish to import.
- A username, password, and authentication DB to access your remote server.
- Your current MongoDB® version has been updated to one of the three most recent versions.
Please ensure the destination is allowed TCP access on port 27017 in the remote server.**
Two Methods For Importing Your MongoDB® Data
- Import into a newly created cluster at ScaleGrid.
- Import during the cluster creation process.
In this tutorial, we're going to show you how to import into an existing, newly created cluster at ScaleGrid. To learn how to import your MongoDB® data during the cluster creation process, check out these docs based on your plan:
Importing Into An Existing MongoDB® Cluster
Before starting your import into your newly created MongoDB® cluster at ScaleGrid, verify that there is no data in this cluster so that any existing data isn't overwritten. If you'd like to override your existing data in the import, first create a backup to ensure your existing data is preserved.
Ensure the local & Public IP addresses of the cluster you would like to import to are whitelisted on the remote server to allow access on port 27017. On a sharded cluster, the import process runs on the first shard router and it’s IP addresses need to be whitelisted. The public IP address can be obtained by pinging the router.
- Log into your ScaleGrid account, or start a free 7-day trial.
- Go to your MongoDB® dashboard, and select the cluster you'd like to import to.
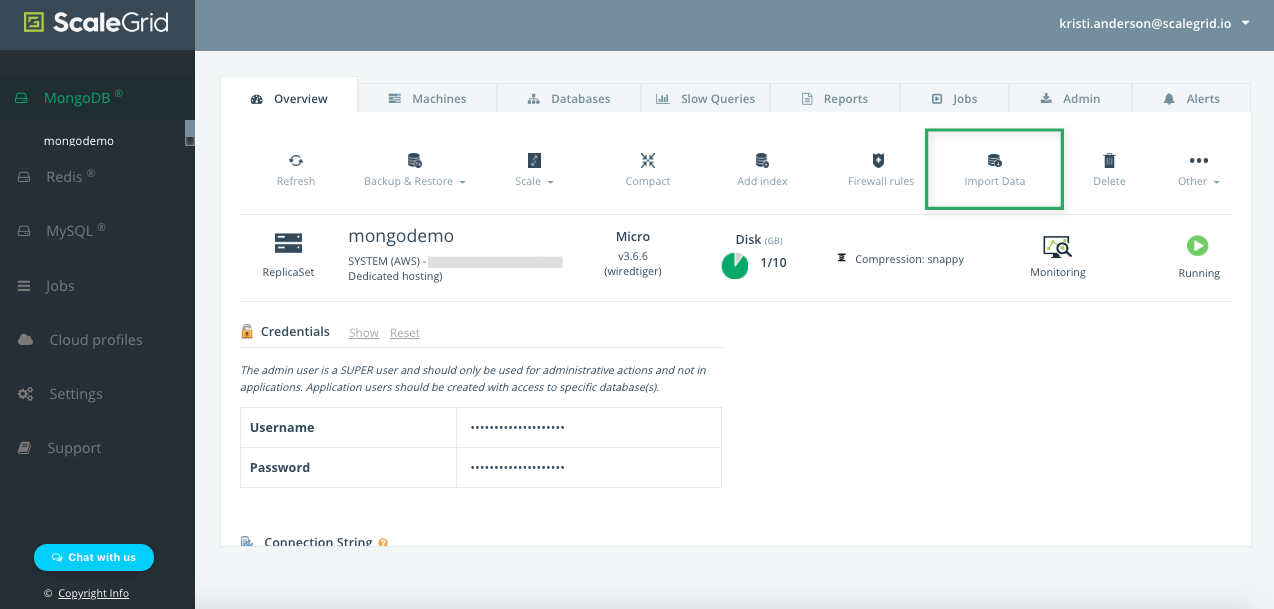
- Under the Overview tab, click Import Data.

Find your Import Data button on your MongoDB® cluster details page.
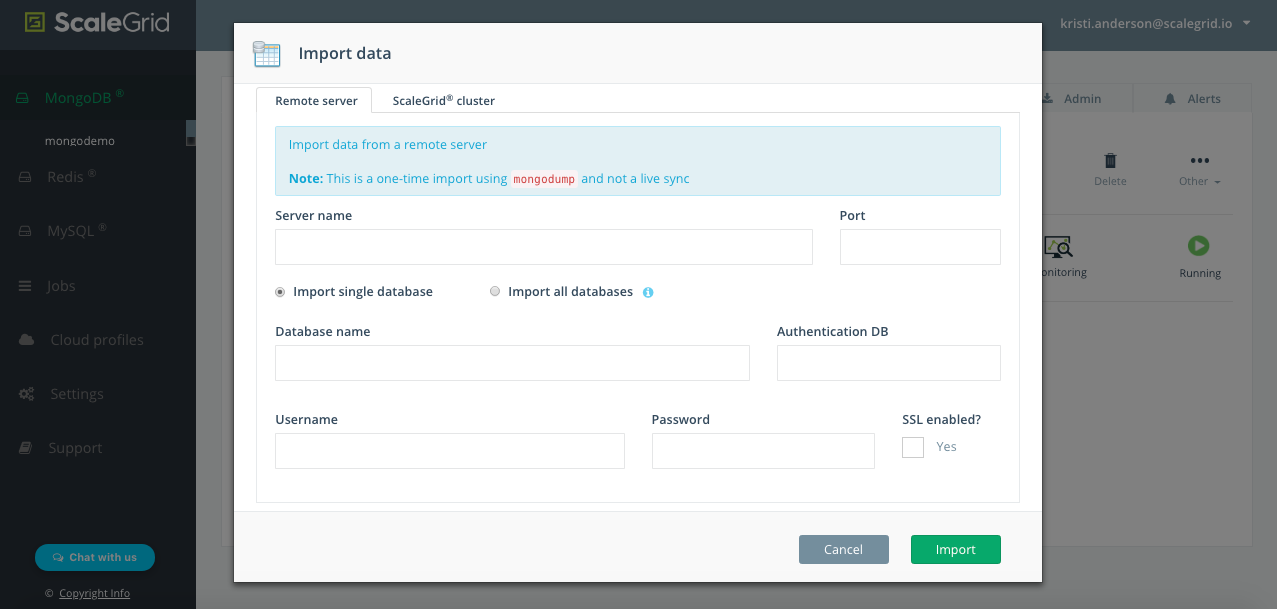
- Stay on the Remote Server tab, and enter your server name and port.
- Select whether you want to import a single database, or all the databases (Admin and local databases will not be imported) from the remote server.
- If you selected to import a single database, enter your Database name and the database which user credentials must be authenticated against (Authentication DB).
- Next, enter the username and password for your remote server. The user must have 'read access' to the databases you are looking to import.
- Check the 'Yes' box if the remote server has SSL enabled.
- Review the information entered is correct, and click 'Import'.
- We will test the connectivity to the remote server once you click Import. If we are able to connect to the remote server, the import job will begin.

Your MongoDB® import has now begun!Your data will be migrated as soon as the import job is complete, and the time will vary based on the size of your data.
Configure Your New MongoDB® Cluster
While your new MongoDB® cluster is being created, check off these important steps to fully complete your setup process:
Grab Your MongoDB® Cluster Credentials
Here are the steps to connect to MongoDB®:
- Go to the MongoDB® Cluster Details page of your newly imported cluster.
- Under the Overview tab, find your Credentials and click Show.
- Copy your Connection String.
- Use these details to update your MongoDB® connection to your application and cancel the previous connection.
Confirm Your Successful MongoDB® Data Migration
After the migration is complete, you'll receive an alert in your ScaleGrid console and confirmation of the email associated with your account. Make sure also to confirm the following:
- Data size and details match your imported cluster.
- Your MongoDB® cluster is connected to your application.
- Your backup schedule is configured.
Updated 5 months ago
